Tag: xray

Veterinary X-Ray Radiation Safety in Canada: What Your Practice Actually Needs to Stay Compliant

INTRIQUIP BLOG COVER 4

A practical walkthrough of shielding, dosimetry, and provincial requirements for veterinary x-ray equipment, and the gaps that come up most often when practices get a closer look.

I’ll be honest: radiation safety is one of those topics that gets a five-minute mention during a new hire’s onboarding and then quietly stops being talked about until something forces the issue, an inspection, an insurance audit, or a staff member asking why they’ve never worn a dosimeter badge. It’s not that vets don’t care about safety. It’s that x-ray becomes so routine that the protocols around it fade into the background, right up until they matter.

This isn’t a scare piece, and it’s not a repeat of the PPE basics either (if you want that ground covered, our piece on hands-free x-ray technique already walks through aprons, thyroid shields, and dosimeters in detail). What this piece covers is the layer above that: where Canada’s rules on veterinary x-ray equipment actually come from, who enforces them, the specific things that catch practices off guard, and how to build an actual written program instead of a folder of paperwork nobody’s looked at in years.

image 18

Where the Rules Actually Come From

This trips people up more than anything else: there isn’t one single “Canadian x-ray law” for veterinary practices. Radiation safety in Canada works in layers, federal guidance, federal law on specific equipment types, and provincial enforcement, and knowing which layer covers what matters when you’re trying to figure out what you’re actually required to do.

At the federal level, Health Canada’s Safety Code 28: Radiation Protection in Veterinary Medicine sets out recommended safety procedures for installing and using veterinary x-ray equipment. It’s the foundational reference most provincial standards are built on, covering shielding principles, room layout, and operator protection. It functions as guidance rather than binding law on its own, but it’s the document nearly every provincial requirement traces back to, and it’s worth reading directly if you’ve never seen it.

The Radiation Emitting Devices Act is federal law, and it’s where a specific, often-missed rule lives: hand-held x-ray units do not meet Canadian requirements and are not permitted for use in this country, full stop. This matters because hand-held pistol-grip style units are marketed heavily in the US veterinary space, and it’s an easy trap for a Canadian practice to fall into if someone’s shopping based on American forums or American product ads. Portable and mobile x-ray generators, the kind mounted on a cart or tripod stand, like the systems most practices actually use for equine and field work, are permitted. Hand-held is a different category entirely, and it’s simply off the table here, regardless of what’s available for order online.

Day-to-day enforcement, inspections, permitting, and specific technical requirements sit with the provinces. Ontario’s Occupational Health and Safety Act (Regulation 861, X-Ray Safety) and the Healing Arts Radiation Protection Act cover most permanently installed veterinary x-ray equipment there, administered by the Ministry of Labour, and any modification to permanently installed equipment must be reviewed and approved by an inspector before it’s used again. British Columbia, Alberta, Saskatchewan, and Manitoba each have their own frameworks and regulatory bodies. If you don’t know which body actually inspects your practice, that’s worth finding out before it finds you, not after.

The Three Principles Everything Else Is Built On

Every shielding requirement, every piece of PPE, every room layout guideline comes back to three ideas, often summarized as ALARA (As Low As Reasonably Achievable):

Time. Minimize how long anyone spends near an active beam. This is part of why sedation and positioning aids exist, not just for patient comfort, but to reduce how long a staff member’s hands are anywhere near the exposure field.

Distance. Radiation intensity drops off sharply with distance from the source. Where possible, staff should step back from the table during exposure rather than staying close “just in case.” Roughly six feet is a commonly cited minimum working distance for anyone without lead shielding.


Shielding. When time and distance aren’t enough on their own, appropriately rated lead or lead-equivalent barriers do the rest, whether that’s a fixed wall barrier, a mobile shield, or personal protective equipment.

featured image 1760990548

Shielding: A Quick Refresher, and the Part Most Guides Skip

If someone is in the room during an exposure and isn’t behind a protective barrier, they need to be wearing rated protective equipment, an apron, gloves, a thyroid collar, and ideally lead glasses for anyone regularly present. A widely used industry range for personal shielding is 0.25mm to 0.5mm lead-equivalent, consistent across most jurisdictions’ guidance, though your specific provincial regulator sets the enforceable minimum for your facility, so it’s worth confirming rather than assuming.

The part most PPE guides skip: room shielding is a separate question from personal shielding, and it’s not something you eyeball. Wall, door, and floor shielding for a permanently installed x-ray room is typically determined by a stamped shielding plan, based on your equipment’s output, your expected workload, and what’s on the other side of each wall (an empty hallway needs less than a shared wall with a neighboring tenant or a break room where staff spend hours a day). If your practice has permanently installed equipment and nobody’s ever seen a shielding plan for the room it’s in, that’s worth raising with your equipment provider or provincial regulator, not something to assume was handled when the building was constructed.

Dosimetry: The Part Most Practices Under-Invest In

A dosimetry badge doesn’t protect anyone from radiation. What it does is tell you, in hard numbers, whether your actual day-to-day practices are keeping exposure where it should be. That distinction matters: shielding and positioning are your protection; dosimetry is your evidence that the protection is working, and your early warning system if it isn’t.

The Canadian Veterinary Medical Association supports the use of dosimeters in veterinary practice, and National Dosimetry Services is the primary Canadian provider offering monitoring tailored specifically to the veterinary market. Anyone who’s regularly present during x-ray exposures, not just the primary radiographer, should be enrolled, and badge results should actually be reviewed when they arrive rather than filed away unread.

Special Consideration: Pregnant Staff Members

This comes up in nearly every practice eventually, and it’s worth having a clear answer ready before it does. Prenatal radiation exposure limits are set lower than standard occupational limits, reflecting the increased sensitivity of a developing fetus to radiation exposure compared to an adult. The practical response most practices land on is straightforward: once a staff member has declared a pregnancy, they should not be the one manually restraining patients during exposures or otherwise routinely present in the room during radiographic procedures, full stop, regardless of how experienced or careful they are. This isn’t about doubting anyone’s technique. It’s about the exposure limit itself being different, not the skill required to stay under it.

Having this worked out as policy ahead of time, rather than improvised awkwardly in the moment, is one of the simplest, lowest-cost things a practice can do to actually protect staff.

What Actually Tends to Come Up

Talking to colleagues and looking at how these programs tend to fall short over time, the same handful of issues show up again and again, none of them exotic, all of them fixable in an afternoon:

No written safety procedure. Verbal habits (“we always ask the tech to hold the leg like this”) aren’t the same as a documented protocol staff can be trained against and held to, and a verbal habit doesn’t survive staff turnover the way a written one does.

No one clearly responsible. Every practice needs someone, doesn’t have to be a full-time role, who owns radiation safety specifically: reviewing dosimetry reports, scheduling PPE inspections, keeping records, and being the person who actually knows where the shielding plan is filed. Without a named person, this quietly becomes nobody’s job.

Dosimetry badges present but not consistently worn. Usually not out of carelessness, more often because the habit was never built in during onboarding and nobody’s checking.

PPE that’s aged out without anyone noticing. Aprons don’t announce that they’ve degraded. Without a periodic check, a fluoroscopic check for cracks, or at minimum a visual and physical inspection, thinning goes unnoticed until a survey catches it, or worse, until it doesn’t.

Manual restraint without adequate justification. Sedation, positioning aids, and mechanical restraint should be the default; hands-on restraint should be the exception with documented reasoning, not the routine approach because it’s faster on a busy day.

No record of equipment inspection. Especially relevant for permanently installed systems, where any modification typically needs review by a provincial inspector before use resumes, and where a paper trail matters if your practice is ever audited.

Building an Actual Program, Not Just a Compliance Folder

If you’re starting closer to zero than you’d like to admit, here’s a reasonable sequence:


  1. Confirm which provincial body regulates your practice and what their specific requirements are. This varies enough between provinces that assuming one province’s rules apply everywhere is a common and avoidable mistake.
  2. Name someone as the radiation safety lead. It doesn’t need to be a dedicated position, but it does need to be one specific person, not “the team.”
  3. Write down your actual safety procedure, even a one-page version: who wears what, when sedation is preferred over manual restraint, the pregnancy policy, and who’s responsible for equipment checks.
  4. Enroll everyone who’s regularly present during exposures in dosimetry monitoring, and actually review the reports when they come in.
  5. Inspect PPE on a schedule, not just when someone happens to notice a crack.
  6. Get your equipment formally inspected on a regular cycle. This overlaps with general equipment maintenance, but radiation safety inspection specifically checks things like collimation accuracy and tube housing leakage that a general service check might not, and after any new install or modification, a proper survey confirms the room’s shielding is actually doing its job before regular use begins.
  7. Keep records somewhere findable. Dosimetry reports, inspection records, and your written procedure should live somewhere a new hire (or an inspector) can actually locate them, not scattered across whoever happened to receive each email.

Frequently Asked Questions

Is hand-held x-ray equipment legal for veterinary use in Canada?

Bringing It Together

Radiation safety compliance isn’t complicated, but it does require someone to actually own it, rather than assuming it’s covered because badges were ordered two years ago or aprons were purchased when the practice opened. A short written procedure, a named safety lead, consistently worn dosimetry, and a regular PPE and equipment inspection schedule cover the vast majority of what provincial inspectors and Health Canada’s guidance actually expect.

If it’s been a while since your imaging equipment had a formal safety inspection, Intriquip’s inspection service covers this specifically, our repair team can address equipment issues that turn up along the way regardless of where the equipment was originally purchased, and our x-ray accessories and PPE line covers aprons, thyroid collars, glasses, and storage racks if any of yours are overdue for replacement. And if this has you thinking about your imaging setup more broadly, our recent piece on choosing between fixed, portable, and CR x-ray systems and our earlier guide to hands-free x-ray technique and PPE are useful next reads.


Further reading:


AUTHOR CARD INTRIQUIP

Veterinary Imaging Equipment Explained: Fixed, Portable, and CR X-Ray Systems for Every Practice Type

banner

A veterinarian’s guide to matching veterinary imaging equipment, fixed DR, portable, and CR X-ray systems, to your practice’s actual case mix and workflow.

If you have ever sat in on an equipment demo, you know how it usually goes. The rep walks you through resolution numbers, panel specs, and software features, and by the end you have a general sense that the system is “good,” without a clear sense of whether it is right for your practice. I have made equipment decisions both ways: once based on what a colleague recommended without much thought, and once after actually mapping the choice to my case load. The second approach saved me money and, more importantly, saved my technicians a lot of frustration. 

This is not a spec sheet. It is a framework for thinking through veterinary imaging equipment the way you would think through any other clinical decision: start with what you actually see walk through the door, then work backward to the tool that fits.

BLOG BODY

The Three Equipment Categories, and What They Are Actually For

Most veterinary radiography equipment falls into one of three categories. Each one solves a different problem, and none of them is universally “better.”

Fixed DR (direct digital radiography) systems are built into a dedicated radiography room, usually with a wall-mounted or floor-mounted tube stand and a table-integrated or cassette-sized DR panel. These systems are built for throughput. If you are running a busy small animal general practice with a steady stream of orthopedic, thoracic, and abdominal studies, a fixed DR system lets your technicians move from patient to positioning to image review in under a minute, with instant feedback on exposure quality before the patient is off the table.

Portable or handheld DR units trade some of that throughput for flexibility. These are the systems you reach for when the patient cannot easily come to the equipment: ambulatory equine and food animal work, in-kennel imaging of a fractious or non-ambulatory patient, or an exotic or avian case where standard positioning setups do not apply well. A portable unit will rarely match a fixed system’s speed in a high-volume small animal room, but that is not the job it is meant to do.


CR (computed radiography) systems use cassette-based imaging plates that are read by a separate CR reader, rather than a panel that produces an image instantly. CR still has a legitimate place, particularly in multi-room practices where a single CR reader can serve several exam or surgery rooms, or in lower-volume practices where the capital cost of DR is harder to justify. The honest tradeoff is workflow speed: there is a processing step between exposure and image that DR eliminates, and at higher volumes that extra step adds up over a full day of appointments.

Uveo2500 2 1

What Makes a Digital Radiography Machine Different from CR

The distinction between DR and CR comes down to three practical factors that matter more than most spec sheets suggest.

Image capture speed and retake workflow. With DR, the image appears on screen within seconds of exposure, so a technician can catch a rotation artifact or motion blur and reposition the patient immediately, often before the patient has even relaxed from the first attempt. With CR, that same mistake is not visible until the cassette has been run through the reader, which means the patient may need to be repositioned from scratch after the fact. In a practice doing sedated or anesthetized studies, this difference has real implications for anesthesia time.

Panel technology. DR panels come in wireless and tethered configurations. Wireless panels offer more positioning flexibility, useful for large-breed abdominal studies or awkward angles, but they add battery management and a slightly higher repair cost if dropped. Tethered panels are more durable and typically less expensive, at the cost of some positioning flexibility.

Long-term cost of ownership. DR panels represent a larger upfront investment, but there are no ongoing consumable costs. CR systems have a lower initial equipment cost but require an ongoing supply of imaging plates and periodic reader maintenance. Over a five to seven year equipment life, practices doing high study volumes generally find DR pays for itself faster than the upfront price difference suggests. Practices with lower or highly variable volume may find CR’s lower entry cost is the more sensible fit.

Matching Equipment to Practice Type

This is where the decision actually gets made, and where a lot of practices get it wrong by copying what a nearby clinic bought rather than looking at their own case mix.

Urban small animal cat and dog practice. A fixed DR system is almost always the right call here. Volume is typically high enough to justify the capital cost, and panel size should be chosen based on your typical patient size distribution. A practice seeing a lot of large-breed dogs will want a larger panel to avoid multiple exposures for a single abdominal or thoracic study.

Mixed practice with small animal and equine or large animal work. This is where portable DR earns its cost. A generator with sufficient output for equine limb and even some equine thoracic work, paired with a portable panel, lets you bring the equipment to the patient in a stall or field setting rather than trying to bring a 1,200 pound patient to a fixed unit.

Exotic or avian-focused practice. Panel size flexibility and low-dose capability matter more here than raw throughput. A smaller format panel, or a portable unit that can be positioned close to a small patient without excessive collimation, will produce better diagnostic images than a system built around canine and feline sizing.


Multi-doctor or multi-room practice. If you have several exam or treatment rooms and want imaging capability in more than one location without the cost of multiple DR panels, a shared CR reader with cassettes distributed across rooms can be a genuinely sound economic choice, provided your volume per room does not create a bottleneck at the reader.

BLOG BODY 1

Generator Output and Panel Size: What Actually Matters for Case Volume

Two specifications get glossed over in most sales conversations, and both matter more than resolution numbers for most general practice work.

Generator output (kW). A generator that is undersized for your typical patient density will show up as grainy, underexposed images on large-breed or deep-chested dogs, or will require technique compromises that increase retake rates. Practices that see mostly cats and small dogs can run comfortably on a lower output generator. Practices with a meaningful large-breed or mixed-species caseload should size up, even if it costs more upfront, because the alternative is a system that struggles with exactly the studies where image quality matters most.

Panel size. A panel that is too small for your typical study forces either multiple exposures stitched together for large-breed abdominal or thoracic views, or compromises on positioning that can obscure the region of clinical interest. Panel size should be chosen based on your actual patient population, not the largest panel available or the cheapest one on offer.


Duty cycle. This is the specification most often ignored, and the one that causes the most frustration after purchase. Duty cycle determines how many exposures a generator can produce in a given period before it needs to cool down. A practice that undersizes duty cycle for its volume will find the system underperforming precisely during its busiest hours, which is the worst possible time to discover a limitation.

digital radiography industry

Where Intriquip’s Line Fits

Rather than walking through a list of model numbers, it is more useful to think in categories. Intriquip’s veterinary X-ray equipment lineup spans fixed DR systems suited to high-volume small animal practices, portable and generator options for mixed and equine work, and configurations that support multi-room CR setups. The right starting point is not “which system is best” but “which category matches the practice type described above,” and working from there toward a specific configuration and panel size suited to your actual case volume.

Common Mistakes When Choosing Equipment

A few patterns show up repeatedly in equipment decisions that later get second-guessed.

Overbuying capacity for case volume that does not exist. A high-throughput fixed DR system is not worth the capital cost for a low-volume practice that could be well served by CR or a more modest DR configuration.

Underbuying generator output for a mixed-practice case mix. This is the most common regret I hear from colleagues who added even occasional large-breed or equine work to a system originally sized for a small animal only practice.


Ignoring service and support availability in the buying decision. Equipment choice is a long-term relationship, not a single transaction. A system with excellent specifications but poor local service support, or a repair process that takes weeks rather than days, will cost you more in downtime than the specification advantage was ever worth.

Frequently Asked Questions

How much does a veterinary X-ray machine cost?

Cost depends heavily on the category. CR setups generally have the lowest upfront cost but carry ongoing plate and reader maintenance expenses. Fixed DR systems cost more initially, often several times a comparable CR setup, but eliminate consumable costs and pay that difference back faster in high-volume practices. Portable DR units fall in a similar range to fixed systems, with cost driven more by generator output and panel quality than by the fact that they are portable. Ask any vendor for total cost of ownership over five to seven years, not just the sticker price, since that is where the real comparison happens.

Neither is universally better. DR wins on speed, since there is no cassette processing step and technicians can catch a positioning error before the patient leaves the table. CR wins on flexibility for multi-room practices, since one reader can serve several rooms at a lower total capital cost. The right choice depends on your volume per room and how much anesthesia or sedation time you are trying to protect.

 Panel size should match your typical patient population, not the largest option available. A practice seeing mostly cats and small to medium dogs can run comfortably on a smaller panel. A practice with a significant large-breed or mixed-species caseload needs a larger panel to avoid stitched or multiple exposures on abdominal and thoracic studies, which slows down the exam and increases patient handling time.

For most high-volume small animal general practices, no. Portable units are built for flexibility, not throughput, and will generally be slower in a dedicated radiography room setting than a fixed DR system. Portable units earn their value in ambulatory equine and food animal work, in-kennel imaging of fractious or non-ambulatory patients, and exotic cases where standard positioning does not apply. Many mixed practices run both: a fixed system for the small animal side and a portable unit for equine or field work.

Generator output should be sized to your typical patient density, not your average patient size. A practice with even occasional large-breed, deep-chested, or equine cases needs more output than one seeing only cats and small dogs, because undersized output shows up as grainy or underexposed images precisely on the studies where diagnostic quality matters most. If you are regularly compromising on technique to get a usable image on your larger patients, that is a sign your generator is undersized for your actual case mix.

This varies by system and usage volume, but most manufacturers recommend at least an annual inspection, with higher-volume practices benefiting from more frequent checks. Beyond scheduled maintenance, service and repair turnaround should be a factor in your original purchase decision. A system with excellent specifications but a multi-week repair process will cost you more in downtime than the specification advantage was ever worth.

Bringing It Together

The right veterinary imaging equipment is the one that matches your practice type, your case mix, and your actual daily volume, not the one with the most impressive spec sheet or the one your neighboring clinic happens to run. Start with what walks through your door on a typical week, size generator output and panel dimensions to that reality, and choose between fixed DR, portable DR, and CR based on where your patients actually need to be imaged.


If you are weighing a new system or an upgrade, Intriquip’s imaging equipment team can walk through your specific case mix and practice layout to help match a configuration to how your practice actually works, backed by service and financing support built for the life of the equipment, not just the purchase.

AUTHOR CARD INTRIQUIP

Mindray Z60 Vet vs. M9Vet: Which Ultrasound Fits Your Caseload?

Mindray Z60 Vet vs. M9Vet

If you’ve already worked through the fundamentals of choosing a system, the real decision usually comes down to comparing two specific machines against what you actually scan day to day. The Mindray Z60 Vet and the M9Vet sit at different points in Mindray’s veterinary lineup, and the gap between them is bigger than a simple “good vs. better” story. The M9Vet is a genuinely premium platform, but it makes real trade-offs to get there — and those trade-offs are worth understanding before you assume more advanced automatically means better fit.

Here’s an honest, spec-accurate comparison, built around the clinical decisions that actually separate these two systems.

The core difference: general-purpose imaging vs. a cardiac-grade quantitative platform

The Z60 Vet is a well-rounded, mid-tier system built for general companion and large-animal imaging. It includes Tissue Doppler Imaging, 3D/4D imaging options, Mindray’s Phase Shift Harmonic Imaging, and the standard iClear/iTouch/iZoom/iBeam toolkit, all on a 15-inch, 60-degree tilting screen with 1TB of storage and two probe connectors.

The M9Vet is built around a different mission entirely. It centers on Mindray’s mQuadro platform and 3T single-crystal transducer technology, adds Tissue Tracking with Quantitative Analysis, and includes Echo-Enriched Beam Forming alongside Tissue Harmonic Imaging and Phase Shift Harmonic Imaging. Its probe catalog is the most extensive in Mindray’s veterinary lineup, and critically, it’s the only system in this comparison with true phased-array cardiac probes — the transducer type built specifically for cardiac imaging through the narrow acoustic windows between ribs.

That’s the real dividing line. If cardiology or advanced quantitative imaging is a defined part of your practice, the M9Vet is built for that work in a way the Z60 simply isn’t. If your caseload is general abdominal, soft-tissue, and reproductive imaging with occasional Doppler work, the Z60’s toolkit already covers that ground well, and the M9Vet’s specialized capability would go underused.

Transducer technology: where the M9Vet’s premium positioning is genuine, not marketing

It’s worth being specific about what “3T single-crystal transducer technology” actually means, because it’s easy to wave past as a spec-sheet buzzword when it’s actually a meaningfully different manufacturing approach.

Most ultrasound transducers use piezoelectric ceramic elements to convert electrical signals into sound waves and back. Single-crystal transducer material is a different class of material entirely, with substantially higher electromechanical conversion efficiency — more of the electrical energy put into the crystal converts into usable acoustic energy, and more of the returning echo converts back into a clean electrical signal. In practical terms, that generally translates into better penetration at a given frequency, improved contrast resolution, and cleaner images in technically difficult patients, without the compromises that usually come from just cranking up gain on lower-efficiency elements.

Combined with Echo-Enriched Beam Forming and the mQuadro platform underneath it, the M9Vet’s imaging pipeline is a genuine step up in raw image formation, not just an accessory feature layered on top of the same core hardware as the Z60.

Tissue Tracking with Quantitative Analysis: a capability the Z60 doesn’t have at all

This is the single feature most likely to be the deciding factor for a cardiology-forward practice, and it’s exclusive to the M9Vet in this comparison.

Tissue Tracking with Quantitative Analysis allows the system to measure and track the movement and deformation of cardiac tissue over time rather than relying purely on visual assessment, giving you objective, repeatable numbers for things like wall motion and contractility rather than a qualitative read. That’s meaningfully different from Tissue Doppler Imaging alone (which the Z60 offers), since Doppler measures velocity at a point while quantitative tissue tracking builds a fuller picture of tissue mechanics over the cardiac cycle. For a practice doing serious cardiac workups, referral cardiology, or research-adjacent imaging, that’s not a marginal upgrade — it’s a different tier of capability entirely.

For a practice where cardiac imaging means confirming a murmur or checking chamber size on a routine wellness scan, this capability will likely go unused, and the Z60’s Tissue Doppler Imaging plus standard PW Doppler is enough for that level of work.

The trade-offs: storage and probe connectors

This is the part of the comparison that’s easy to miss if you only look at the headline imaging specs, and it’s worth flagging clearly because it runs counter to the assumption that the more premium machine is better equipped across the board.

Storage: The Z60 Vet includes 1TB of onboard storage. The M9Vet includes 256GB — a quarter of the Z60’s capacity. For a practice archiving large volumes of studies, video loops, or 3D/4D captures locally on the machine rather than offloading regularly to PACS or a local server, that’s a real practical difference worth planning around.

Probe connectors: The Z60 Vet has two probe connectors, letting you keep two transducers plugged in and switch between them mid-exam without stopping to swap cables. The M9Vet has only one. Given that the M9Vet’s whole probe catalog runs to 17 options — the largest in this lineup, including multiple phased-array and linear probes for different exam types — having only a single connector means more physical probe-swapping during a workflow that might reasonably call for two or three transducers in the same visit (general abdominal, then cardiac phased-array, for instance).

Neither of these is a dealbreaker on its own, but together they’re a genuine workflow consideration, not a footnote. It’s worth asking directly at quote stage whether a multi-connector adapter or docking accessory is available for the M9Vet if this is a concern for your team.

Screen, interface, and day-to-day usability

The Z60 Vet uses a 15-inch screen with a 60-degree tilting angle. The M9Vet’s screen is slightly larger at 15.6 inches, though Mindray’s published specs don’t list a tilt range for it the way they do for the Z60 — worth confirming directly if screen positioning flexibility matters to your exam room setup.

Both systems share the same core image-optimization toolkit: iClear for speckle reduction, iTouch for one-click optimization, iZoom for full-screen viewing, and iBeam for compounding scan angles into a single image. Day-to-day navigation should feel broadly familiar moving between the two, even though the M9Vet’s underlying image-formation technology is more advanced.

Battery and charge time

Both systems offer approximately 1.5 hours of scanning time on their rechargeable batteries. Charge time is where they differ slightly: the Z60 Vet recharges in about 3 hours, while the M9Vet takes closer to 4 hours. For a single-system practice running back-to-back appointments, that extra hour matters more than it might first appear — worth factoring into how you plan charging windows between clinic days.

DICOM 3.0

Neither system includes DICOM 3.0 as standard — it’s listed as optional on both the Z60 Vet and the M9Vet. If PACS integration or referral image-sharing is part of your workflow, budget for that add-on regardless of which of these two systems you choose, and confirm current pricing with your rep at quote stage.

Species range and transducer flexibility

Both systems are positioned for companion and large-animal work, but the M9Vet’s probe catalog is substantially broader — 17 listed options versus the Z60’s 11. The most clinically significant difference is the M9Vet’s phased-array probes (the P-series and Sp5-1s), purpose-built for cardiac imaging through narrow intercostal windows, which the Z60’s catalog doesn’t include at all. The M9Vet also extends further into high-frequency linear imaging, with options running up to 23MHz for superficial and small-parts work, compared to the Z60’s linear probes topping out around 16MHz.

If your practice does any meaningful volume of cardiac echocardiography, the M9Vet’s probe catalog is built for that work specifically. If your large-animal and small-parts imaging needs are general rather than cardiology-specific, the Z60’s transducer range already covers that ground.

Matched to your actual practice profile

Spec comparisons are useful, but most clinics find it easier to decide by seeing where they actually fit:

General practice with routine Doppler, reproductive, or soft-tissue imaging needs. The Z60 Vet’s Tissue Doppler Imaging, 3D/4D options, larger onboard storage, and dual probe connectors make it the more practical day-to-day system without paying for capability you won’t use.

Cardiology-forward or referral practice doing regular echocardiography. The M9Vet’s single-crystal transducer technology, phased-array cardiac probes, and quantitative tissue tracking are purpose-built for that work in a way nothing else in this comparison matches.

High-volume practice archiving studies locally rather than to PACS. The Z60 Vet’s 1TB of storage is four times the M9Vet’s 256GB — worth weighing seriously if you’re not offloading images regularly.

Practice running multiple exam types back-to-back without time to swap probes. The Z60 Vet’s two probe connectors are a real workflow advantage over the M9Vet’s single connector, particularly given how broad the M9Vet’s own probe catalog is.

Side-by-side summary


Mindray Z60 Vet

Mindray M9Vet

Screen

15″ HD LCD, 60° tilt

15.6″ HD LED

Core imaging

Tissue Doppler Imaging, 3D/4D options, PSH

Tissue Harmonic Imaging, PSH, Echo-Enriched Beam Forming, Tissue Tracking w/ Quantitative Analysis

Transducer technology

Standard

3T single-crystal

Cardiac-specific probes

Not offered

Phased-array (P-series, Sp5-1s)

DICOM 3.0

Optional

Optional

Storage

1TB

256GB

Probe connectors

2

1

Probe catalog

11 options

17 options

Battery

~1.5 hrs scanning, ~3 hr charge

~1.5 hrs scanning, ~4 hr charge

Notable extra

Waterproof keyboard cover

Single-crystal transducer tech

Best fit for

General small/large-animal imaging, routine Doppler

Cardiology-forward or referral practices, quantitative cardiac analysis

The financing question

Both systems are eligible for financing, which changes the calculus for a lot of practices. Spread over the equipment’s useful life, the monthly difference between the two is often smaller than the upfront price gap suggests — particularly once you weigh it against whether cardiac-grade quantitative imaging would get used regularly in your specific caseload, versus paying for capability that sits idle.

Still deciding?

The right answer here depends less on which system has the more advanced spec sheet and more on whether cardiology or quantitative cardiac analysis is a defined, recurring part of your practice. A general small-and-large-animal practice has different priorities than a referral-adjacent clinic building out echocardiography services.

If you want to browse the full ultrasound lineup or talk through which system actually fits your case mix, request a quote and we’ll walk through it against your specific caseload — not just the spec sheet.

New to point-of-care ultrasound on your team? Our training programs cover both systems, whether you’re building Doppler proficiency or getting comfortable with cardiac-specific imaging.

Request a Quote

Frequently Asked Questions

What is the main difference between the Mindray Z60 Vet and M9Vet?

The Z60 Vet is a general-purpose mid-tier system with Tissue Doppler Imaging and 3D/4D options. The M9Vet is a premium platform built around single-crystal transducer technology, phased-array cardiac probes, and Tissue Tracking with Quantitative Analysis — capability aimed specifically at cardiology and advanced quantitative imaging.

No — the Z60 Vet includes 1TB of onboard storage, while the M9Vet includes 256GB. This is worth factoring in if your practice archives studies locally rather than offloading regularly to PACS.

The M9Vet, by a clear margin. It’s the only system in this comparison with true phased-array cardiac probes, and its Tissue Tracking with Quantitative Analysis gives objective, repeatable measurements of cardiac tissue motion that Tissue Doppler Imaging alone doesn’t provide.

he Z60 Vet has two probe connectors, allowing two transducers to stay plugged in during an exam. The M9Vet has only one, which means more manual probe-swapping if your workflow calls for multiple transducer types in the same visit.

No — DICOM 3.0 is listed as an optional add-on on both the Z60 Vet and the M9Vet. Confirm current pricing and availability with your rep if PACS integration is part of your workflow.

AUTHOR CARD INTRIQUIP

Choosing the Right X-Ray Table and Generator Setup for Your Veterinary Clinic

INTRIQUIP BLOG COVER

Vet school covers how to read a radiograph. It doesn’t cover how to actually configure the room it comes from — table type, generator power class, electrical requirements, or how a dental unit fits into the same imaging suite. That’s not a curriculum gap by accident; it’s a facilities and equipment decision, and most of us only really learn it when we’re standing in an empty exam room trying to figure out what to buy.

This guide walks through the practical side of configuring a fixed veterinary x-ray setup: table types, generator power considerations, installation logistics, and how a separate dental unit fits into the picture — the kind of decision that shapes your clinic’s workflow for the next decade, not just the next radiograph.

Table Configuration: 4-Way Float vs. Floor Track

The table underneath the generator affects positioning speed and patient safety as much as the generator itself does:

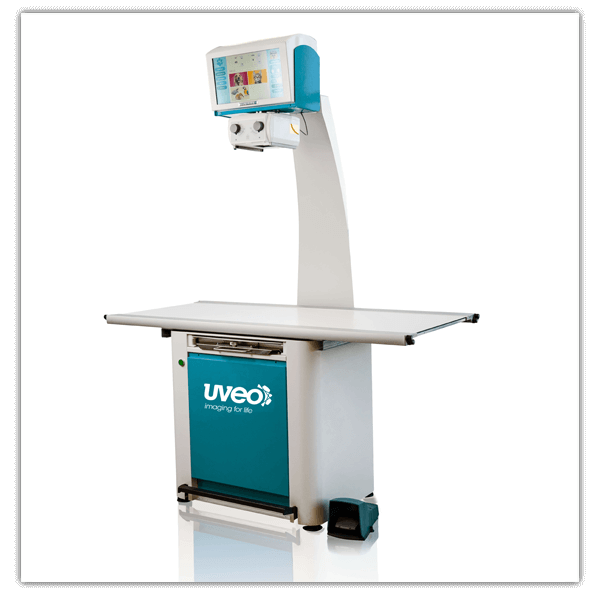
  • 4-way floating tabletop. A table that moves freely in all directions lets you position a patient once and move the table around them, rather than repeatedly lifting or shifting the animal. This matters most with larger, painful, or sedated patients where minimizing movement is a real welfare consideration, not just a convenience. Intriquip’s Uveo HF400 Complete Plus offers an enhanced four-way float range (600mm left-right, 200mm front-back) built around exactly this need.

UVEO HF 400 Complete Plus Digital Radiography Solution for veterinary imaging, available at Intriquip Canada

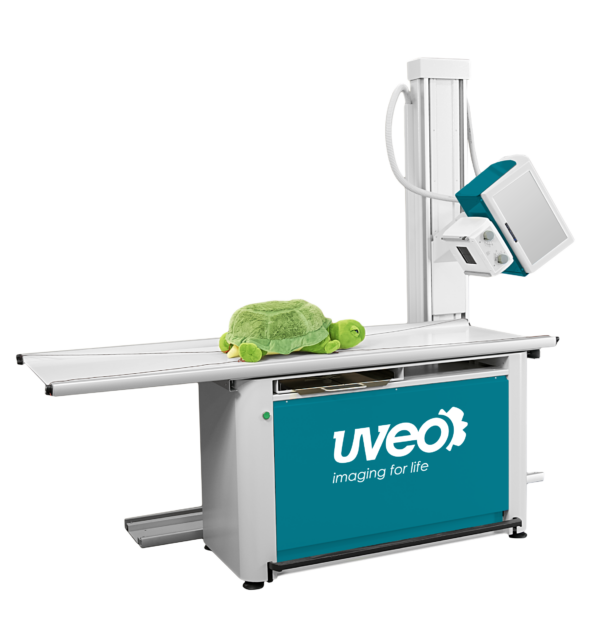
  • Floor track systems. Rather than a floating tabletop, a floor track setup moves the tube stand along a track mounted to the floor, which can suit clinics prioritizing a fixed, high-throughput imaging room layout. Intriquip’s Uveo HF400-FT floor track table is built for this configuration.

Uveo HF400-FT Floor Track X-Ray Table

  • Enhanced float range upgrades. Some systems, like the Uveo HF400 II Plus, offer a further-enhanced float range and secure table-top locking, worth considering if your practice handles larger or less cooperative patients regularly.

Neither configuration is universally correct — it depends on your exam room’s physical layout, your typical patient size range, and whether you’re retrofitting an existing room or building one from scratch.

Table Configuration at a Glance

 4-Way Float TabletopFloor Track SystemEnhanced Float Range
Patient positioningTable moves around a stationary patientTube stand moves along a fixed trackTable moves around a stationary patient, wider range
Best forFrequent repositioning, larger/painful patientsFixed, high-throughput room layoutsLarger or less cooperative patients
InstallationStandard tabletop installationRequires floor-mounted track hardwareStandard tabletop installation
Example systemUveo HF400 Complete PlusUveo HF400-FTUveo HF400 II Plus
Room layout impactModerate – table needs float clearanceHigher – track affects room designModerate – table needs float clearance

If you’re retrofitting an existing exam room rather than building one from scratch, tabletop-based systems (float or enhanced float) are generally easier to fit into a space that wasn’t originally designed around a track system.

Signs Your Current Setup Is Working Against You

A few signs suggest your table or generator configuration — not just your imaging technology — is the actual bottleneck:

  • Staff are physically lifting or repositioning patients more than the table is doing the work. If your current tabletop doesn’t float, or floats in a limited range, you’re likely spending more time and more physical effort per exposure than a properly configured system would require.
  • Your generator can’t consistently penetrate your largest patients. If certain views routinely come out underexposed or require a second attempt on bigger dogs or mixed-practice cases, that’s a power output problem, not a technique problem.
  • Dental cases are being awkwardly worked around your main system instead of using dedicated dental equipment, slowing down both dental and general imaging workflows.
  • You’re avoiding remote consultations because your current system doesn’t support network-based image sharing, even though a specialist opinion would help.

None of these are reasons to panic-buy a new system, but if two or more sound familiar, it’s a sign the room configuration itself — not just the age of your equipment — deserves a second look.

Generator Power: Matching kVp and mA to Your Caseload

Generator power specifications aren’t just a number on a spec sheet — they determine whether you can actually get a diagnostic image on the patients you see most:

  • Standard 110V AC installations are worth prioritizing if you want to avoid the cost of dedicated electrical wiring. Systems like the HF400 Complete Plus are specifically built to plug into a regular 110-volt, 15-amp outlet, which keeps installation costs down and simplifies retrofitting into an existing exam room.
  • Capacitor-based generators tend to offer a longer service life than battery-based systems and provide the high-performance output needed for consistent image quality across a full day of cases.
  • Network connectivity is worth checking before you buy — some fixed systems can connect to your clinic network for remote, web-based diagnostics, which matters if you plan to consult with a specialist or read images from another room or location.

Don’t Forget Dental: A Separate Imaging Need in the Same Suite

Dental radiography is a distinct piece of equipment from your main table-and-generator system, and it’s easy to underbudget for it when planning a new or renovated imaging suite. If your practice does regular dental work, a dedicated mobile dental x-ray unit — like the Dentalaire DC Mobile, with its ergonomic touchscreen control and aluminum positioning arm — lets you handle intraoral imaging without adapting your main table system for a job it wasn’t built for.

Fixed vs. Portable: A Quick Note on Scope

This guide focuses on fixed, in-clinic table and generator configurations. If your practice does regular farm calls, ambulatory equine work, or needs imaging capability outside a permanent room, that’s a different equipment category with its own tradeoffs around power source and detector ruggedization — worth a separate conversation with your supplier rather than trying to make a fixed system do double duty.

What to Compare Before You Buy

  1. Table type and float range — match this to your actual patient size range and positioning needs, not just what’s cheapest.
  2. Generator power and electrical requirements — confirm your exam room’s electrical setup matches what the system needs before you commit to an installation timeline.
  3. Network and software connectivity — worth prioritizing if remote consultation or specialist referral is part of your workflow.
  4. Dental imaging — budget for it separately if it’s part of your practice, rather than assuming your main system covers it.
  5. Installation and service support — ask what’s included in the purchase versus billed separately, and what happens if something needs repair down the line. Intriquip’s equipment repair services include factory-authorized warranty repairs and a loaner-equipment program, worth asking about regardless of which supplier you choose.
  6. Financing structure — a full table-and-generator setup is a meaningful capital investment. Intriquip’s overview of equipment financing options for Canadian clinics covers leasing and financing paths if you’d rather structure the purchase over time.

Bottom Line

The table and generator you choose shapes your clinic’s imaging workflow for years, not just the next radiograph — table type affects patient positioning and staff time, generator specs determine whether your system can actually handle your caseload, and dental imaging needs its own budget line rather than an afterthought. None of this is covered in a clinical curriculum, which is exactly why it’s worth working through deliberately before you sign a quote.

If you want to configure a table-and-generator setup around your specific exam room and caseload, Intriquip’s veterinary x-ray systems team can walk through the options.

What's the difference between a 4-way float table and a floor track system?

4-way floating tabletop moves in multiple directions so the patient can stay still while the table repositions around them. A floor track system instead moves the tube stand along a fixed track, which can suit clinics prioritizing a permanent, high-throughput room layout over tabletop flexibility.

It depends on the system. Some fixed generators are built to plug into a standard 110-volt, 15-amp outlet without additional wiring, while higher-output systems may require a dedicated circuit or more involved electrical work — confirm your exam room’s setup with an electrician before assuming a same-day install.Lorem ipsum dolor sit amet, consectetur adipiscing elit. Ut elit tellus, luctus nec ullamcorper mattis, pulvinar dapibus leo.

Not effectively. Dental imaging generally needs a dedicated mobile or wall-mounted dental x-ray unit built for intraoral positioning, rather than adapting a general table-and-generator system meant for full-body imaging.

If you plan to consult with a specialist remotely or want to read images from another room or location, yes — not every fixed system supports network-based remote diagnostics, so it’s worth confirming before you buy rather than assuming it’s standard.Lorem ipsum dolor sit amet, consectetur adipiscing elit. Ut elit tellus, luctus nec ullamcorper mattis, pulvinar dapibus leo.